- HTML Course
- HTML Tutorial
- HTML Document Structure
- HTML Root Tags
- HTML Flow Tags
- HTML Interactive Tags
- HTML Basic Tags
- HTML Paragraph
- HTML Line Break
- HTML Horizontal Line
- HTML Images
- HTML Data Types
- HTML Attributes
- HTML Character Entities
- HTML Styles
- HTML Formatting Text
- HTML Logical Style Text
- HTML Organizing Text
- HTML List
- HTML Tables
- HTML Forms
- HTML action Attribute
- HTML Multimedia
HTML Tutorial for Beginners with Examples
Hello, my name is William. I'm a web developer with over ten years of experience. This "HTML" course was created and designed by me. I designed the course so that even beginners can understand each and every topic in the field. So, without further ado, let's get started.
What is HTML?
HTML, which stands for "HyperText Markup Language," is a markup language that is used when creating a document or page for display in a web browser.
HTML is a standard markup language. We can supplement it with additional web technologies such as CSS, JavaScript, PHP, Python, and so on. For example, we can use "CSS" to design the content of the final page displayed in the web browser that was created with HTML, and "JavaScript" to handle user interaction on that page.
In layman's terms, HTML is a language used to publish content such as text, images, videos, pdfs, and so on to the web or internet.
Let me first assist you in getting and seeing the practical output of using "HTML" before getting a further introduction to HTML. As a result, the additional HTML explanation helps you better understand the topic. Now follow the following steps:
Step No.1: Open any text editor, such as "Notepad," or any other multi-tasking text and code editing software, such as "Visual Studio Code," and enter the following HTML code:
<!DOCTYPE html>
<html>
   <body>
      <h1>Welcome to my blog</h1>
      <p>Lorem ipsum dolor sit amet, consectetur adipisicing elit.</p>
   </body>
</html>
Step No.2: Save the file with the ".html" or ".htm" extension, for example, "codescracker.html."
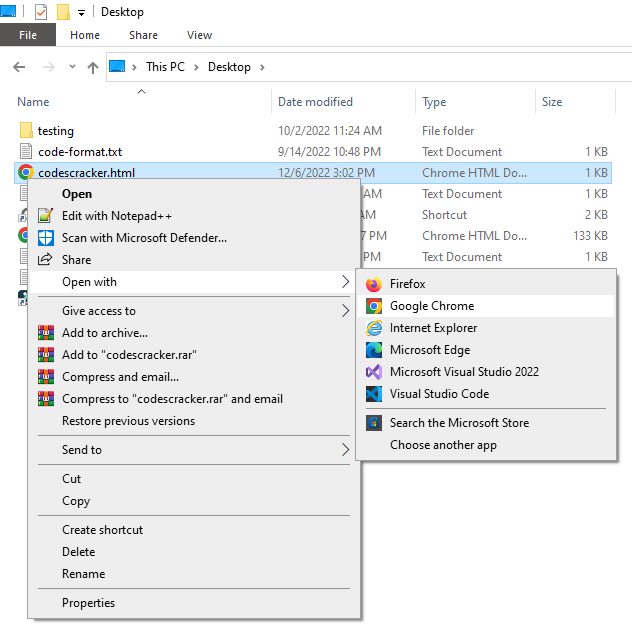
Step No.3: Now, right-click on the file "codescracker.html," select "Open with," and then choose any browser to open the file in any web browser, as shown in the screenshot below:
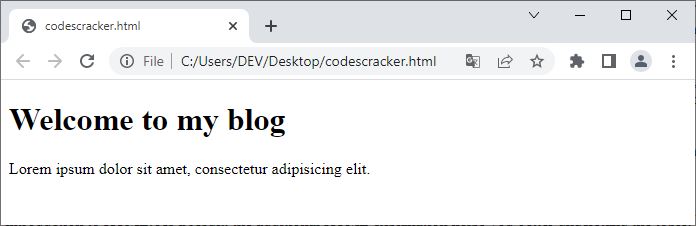
Step No.4: Since HTML documents render their content on the web browser into multimedia web pages, you will see the following output after opening the file in a web browser:
In the above HTML code, the following are the HTML elements:
- <!DOCTYPE html>
- <html>
- <body>
- <h1>
- <p>
HTML elements are the foundation of web pages. The <h1> or <H1> element is used to include a heading on a web page. Similarly, when we need to include a paragraph in the web page, we use the <p> or <P>. You will be taught everything one by one. These are simply demonstrations to pique your interest and ensure that you understand the subject thoroughly.
Note: The </HtmlElement> is used to close the tag. For example: Use </p> to close the paragraph tag.
That's it; now let me go back to the original state and start the course from the very beginning and go deep into it, step by step.
What is "hyper" in HTML?
The term "hyper" in HTML refers to jumping around from one place to another in a circuitous route. When you click a link on a Web page, you go to the appropriate page on the Internet or the Web site, which may or may not be the next page on the Web site.
A brief history of HTML
HTML was first released in 1993. It was developed by a physicist named "Tim Berners-Lee." The first version of HTML was released or published this year. And the HTML has been constantly changed since then, until now. HTML evolves into a more powerful and feature-rich language with each release. The HTML versions and the year they were released are listed below.
| HTML Version | Released Date |
|---|---|
| HTML 2 | 24-11-1995 |
| HTML 3 | 14-01-1997 |
| HTML 4 | 18-12-1997 |
| HTML 5 | 28-10-2014 |
Minor changes were made to HTML 4 without changing the version. Furthermore, "HTML 4" was changed by changing the number, making it "HTML 4.01." Again, "HTML 4.01" was modified without changing the version number.
The same thing occurred with "HTML 5." That is, it has changed twice since I wrote this post. The two modified versions are as follows:
- On November 1, 2016, HTML 5.1 was released.
- HTML 5.2 was released on December 14, 2017.
HTML Basics
HTML, as previously stated, is a standard language used to design and develop web pages. So, before you start creating web pages with HTML, you should be familiar with the fundamentals.
HTML uses tags and attributes to define the content, or the structure and layout, of a Web page. An element consists of opening and closing tags, along with the content they contain, and attributes that specify additional information (like where on a Web page the element should be aligned).
HTML tags instruct web browsers on how to interpret the document. The tag's attributes contain additional information, such as its behavior and properties. The browser displays the content based on the properties and behaviors defined by the tag and the attributes.
Based on the behavior they exhibit on a web page, HTML tags are classified into the following groups:
- root: contains the main tag of the HTML.
- metadata: contains tags that define the behavior of the entire HTML document.
- section: a collection of tags used to represent different sections of an HTML document.
- heading: contains tags that represent headings in the HTML document.
- flow: contains tags that are used in the BODY tag of an HTML document to define the structure of the document.
- phrasing: contains tags that are used to display the text of an HTML document.
- embedded: contains tags that are used to embed content in the HTML document.
- interactive: includes tags for the user's interactivities.
The "root", "flow", and "interactive" categories are described in a separate article, whereas the remaining categories are going to be covered in this article, starting from the next paragraph.
One recommended article that you should read and understand before going over each of the groups of tags listed above is: HTML document structure.
HTML Metadata Tags
The metadata tags are used to set the presentation or the behavior of the remaining content of the document.
Metadata tags can also be used to set a relationship of a document with other documents.
Metadata tags can be used to provide additional information about an HTML document.
The HTML <HEAD> tag contains the metadata about the HTML document, which is not displayed by the browser and is only used by the search engine to crawl information about the web page.
The HTML <HEAD> tag is placed between the <HTML> and <BODY> tags. Here are the tags that you can include inside the HTML <HEAD> tag, or the following are the metadata tags:
Let's go over each of the above metadata tags one by one, starting with the "TITLE" tag.
HTML TITLE Tag
The TITLE tag contains the title of the HTML document, which appears in the browser's title bar. For example, the following HTML code:
<!DOCTYPE html>
<html>
   <head>
      <title>This is the title of the web page</title>
   </head>
   <body>
      <h1>Welcome to codescracker.com</h1>
      <p>Lorem ipsum dolor sit amet consectetur adipisicing elit. Asperiores expedita sunt architecto aut. Tempora
         dignissimos doloribus eum, asperiores saepe rerum.</p>
   </body>
</html>
produce the following output in the web browser:
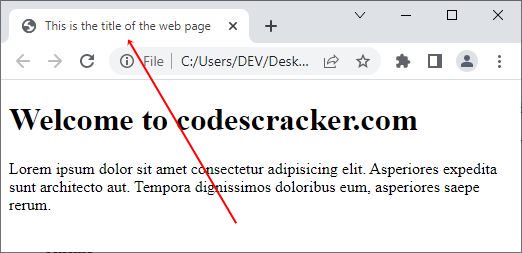
I used a red arrow to draw your attention to the title of the web page. Search engines use this tag to select the document and display it in the search results. For example, if you create a web page with the title "Directory Operations in Operating System," a search engine such as "Google" will use this title to display the page as follows:
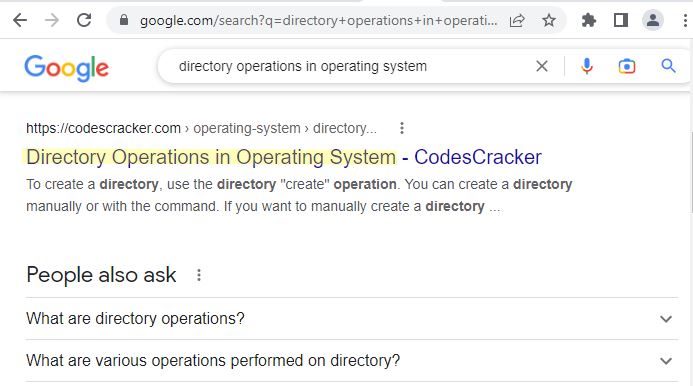
I highlighted the title text to draw your attention. Each HEAD tag should contain a TITLE tag.
Note: Remember to keep the title text short because some browsers may struggle to handle titles longer than 256 characters. However, make it 70 or fewer characters from a search engine perspective.
HTML BASE Tag
All links in an HTML document can have their default URL and target set with the BASE tag. It is recommended that this tag be used as the first tag in the HEAD tag at the beginning of the document. As a result, the BASE tag's data can be used by the other tags in the head section.
The following code fragment shows the use of the BASE tag in an HTML document:
<!DOCTYPE html>
<html>
   <head>
      <base href="url" target="value">
   </head>
</html>
Here is an example using the HTML base tag:
<!DOCTYPE html>
<html>
   <head>
      <base href="https://codescracker.com/">
      <title>HTML Base Tag</title>
   </head>
<body>

   <img src="/images/colpic.jpg" alt="color pic" width="150" height="150">
   <a href="/html/xyz.htm">HTML Metadata Tags</a>

</body>
</html>
If you change the base URL to something else, for example, if the base URL is https://codescracker.com/home, then the image and the other
given links will become something like
https://codescracker.com/home/images/colpic.jpg
and https://codescracker.com/home/html/xyz.htm.
The following list describes the attributes of the BASE tag:
- href: specifies a URL in an HTML document.
- target: specifies the locations where the links in an HTML document open. Following are the four possible values of the target
attribute:
- _blank: This link will open in a new window.
- _parent: Displays the link in the same frame in which it was clicked.
- _self: Displays the link in the current frameset.
- _top: Displays the link in the current window.
- <framename>: Displays the link in the specified frame.
HTML LINK Tag
In order to create a link between two HTML files, the LINK tag is used. Additionally, it specifies the connection between the two HTML files. The href attribute of the LINK tag is used to define the link's target URL. A valid URL must be used for the href attribute, which is a mandatory attribute. The rel attribute, which is part of the LINK tag, specifies how the linked documents are related to one another.
The following code fragment shows the use of the LINK tag:
<head>
   <link href="file" rel="stylesheet">
</head>
Here's an example of how to use the HTML link tag:
<!DOCTYPE html>
<html>
<head>
   <title>HTML Metadata Tags Example - Link Tag</title>
   <link rel="stylesheet" type="text/css" href="style.css">
</head>
<body>

<p>Hello, HTML Metadata Tags Tutorial</p>

</body>
</html>
The following table describes the attributes of the LINK tag:
| Attribute | Value | Description |
|---|---|---|
| href | URL | specifies the target URL you navigate to after clicking the link. |
| hreflang | language_code | defines the base language of the target URL. |
| media | print, braille, aural, all, screen, tty, TV, projection, handheld | specifies the device on which the HTML document is displayed. |
| rel | alternate, archives, author, first, feed, icon, help, index, license, last, next, pingback, prev, prefetch, search, stylesheet, sidebar, tag, up | specifies the relationship between the HTML document and the target URL or another HTML document. |
| type | the mime_type For example: text/javascript, text/css |
specifies the Multipurpose Internet Main Extensions (MIME) type of the target URL. The MIME type determines which type of language rules are to be followed in an HTML page, such as JavaScript or CSS. |
| sizes | any number | defines the size of the linked HTML document. |
HTML Meta Tags
In most cases, metadata is specified by means of HTML meta tags (additional information about the document).
The HTML <META> tag appears inside the HEAD tag and has four attributes, which are described in the following table.
| Attribute | Value | Description |
|---|---|---|
| charset | character encoding | defines the character encoding for the document. |
| contents | some_text | defines the content of the meta data. |
| http-equiv | content-type expires refresh set-cookie |
provides information about the contents attribute to an http header. |
| name | author description keywords generator revised others |
provide the content of the contents attributes. |
The following HTML code fragment shows the use of the META tag in a document:
<head>
   <META name="keywords" contents="keyword list">
</head>
Here is an example using HTML META tags:
<head>
   <meta name="keywords" content="html, meta, tags, example">
   <meta name="description" content="HTML meta tags tutorial with examples">
   <meta name="author" content="codescracker">
   <meta http-equiv="content-type" content="text/html; charset=UTF-8">
   <meta http-equiv="refresh" content="30">
   <meta http-equiv="expires" content="Wed, 20 June 2022 14:25:27 GMT">
   <meta name="robots" content="noindex, nofollow">
</head>
From the above HTML meta tag example, the
- name="keywords" is used to define or give keywords to the web page.
- name="description" is used to provide a description of the web page.
- name="author" is used to provide information about the author of the web page.
- http-equiv="content-type" is used to provide the content type of the web page.
- http-equiv="refresh" is used to provide a delay in web page refreshing.
- http-equiv="expires" refers to the expiration of a web page.
- name="robots" instructs robots not to index the web page's content.
The HTML meta tag can be used to add information about the last time the HTML document was updated. You can see how to set the document's last update time in HTML with this example:
<head>
   <meta name="revised" content="last_updated_time">
</head>
Using the HTML meta tag, you can set your page to automatically refresh after a specified amount of time. Here's an illustration of how to schedule an automatic page refresh every 10 seconds:
<head>
   <meta http-equiv="refresh" content="10">
</head>
The HTML meta tag enables you to change the target of your webpage to another URL. As an illustration of how to change the URL of a website, consider this:
<head>
   <meta http-equiv="refresh" content="10; url=https://codescracker.com">
</head>
The above meta tag is used to redirect the page to "https://codescracker.com" after 10 seconds.
HTML SCRIPT Tag
To include a script like JavaScript in an HTML file, use the SCRIPT tag. The src attribute of this tag specifies an external script file or contains scripting statements. The SCRIPT tag allows you to modify the text and images on Web forms and verify that they are correct.
The following HTML code fragment shows how to use the SCRIPT tag in an HTML document:
<HEAD>
   <SCRIPT type="text/javascript">
      JavaScript code goes here
   </SCRIPT>
</HEAD>
Here is an example using the HTML script tag:
<!DOCTYPE html>
<html>
<head>
   <script type="text/javascript">
      function codescracker() {
         alert("Hey, what's up?");
      }
   </script>
</head>
<body>

   <input type="button" onclick="codescracker();" value="Click Me">

</body>
</html>When you click on the button "Click Me," it triggers the function "codescracker()." Therefore, the function "codescracker()" will be executed, which triggers a function defined in it, "alert()," that alerts a message written as its parameter, which is "Hey, what's up?"
The following table describes the attributes of the SCRIPT tag:
| Attribute | Value | Description |
|---|---|---|
| async | true, false | specifies whether the script should be executed asynchronously or not. |
| type | text/ecmascript text/javascript application/ecmascript application/javascript text/vbscript |
specifies the MIME type of the script. |
| charset | charset | specifies the character encoding used in the script. |
| defer | true false |
specifies whether or not the browser can continue parsing the HTML document. |
| src | URL | specifies the URL of a file that contains the script. |
If the value of the async attribute is true, then the script executes asynchronously. In this case, the script executes while the document is parsed. And if the value of the async attribute is false but the value of the defer attribute is true, then the script is executed after the document has finished parsing. If the values of the async and defer attributes are false, then the script is executed immediately, and the HTML page waits for the script to finish executing before continuing the parsing.
HTML NOSCRIPT Tag
If your browser doesn't support JavaScript or you've disabled it, the NOSCRIPT tag will tell your browser to display some fallback content instead. Web browser support for JavaScript is also a factor in whether or not the NOSCRIPT tag is taken into account.
The following HTML code fragment shows the use of the NOSCRIPT tag:
<SCRIPT type="text/javascript">
   document.write("Have a nice day.")
</SCRIPT>
<NOSCRIPT>
   JavaScript is disabled or not supported in your browser.
</NOSCRIPT>
HTML STYLE Tag
The style sheet within an HTML document is declared using the HTML STYLE tag. This tag tells the browser how to interpret the HTML code.
The following HTML code fragment shows the use of the STYLE tag:
<HEAD>
   <STYLE type="text/css">
      Style code goes here
   </STYLE>
</HEAD>
Here is an example using the HTML style tag:
<!DOCTYPE html>
<html>
<head>
   <style type="text/css">
      .myClass {
         background-color: purple;
         color: whitesmoke;
         padding: 12px;
         font-size: 32px;
      }
   </style>
</head>
<body>

   <div>
      <p>Lorem ipsum dolor sit amet, consectetur adipisicing elit.</p>
   </div>

   <div class="myClass">
      <p>Lorem ipsum dolor sit amet consectetur adipisicing elit.</p>
   </div>

   <div>
      <p>Lorem ipsum dolor sit amet, consectetur adipisicing elit.</p>
   </div>

   <div class="myClass">
      <p>Lorem ipsum dolor sit amet consectetur adipisicing elit.</p>
   </div>

</body>
</html>Lorem ipsum dolor sit amet, consectetur adipisicing elit.
Lorem ipsum dolor sit amet consectetur adipisicing elit.
Lorem ipsum dolor sit amet, consectetur adipisicing elit.
Lorem ipsum dolor sit amet consectetur adipisicing elit.
See our "CSS tutorial" for more information on how to modify the appearance of your website.
The following table describes the attributes of the STYLE tag:
| Attribute | Value | Description |
|---|---|---|
| type | text/css | specifies the type of content, such as simple text or a style sheet, in an HTML document. |
| media | screen, tty, tv, projection, handheld, print, braille, aural, all | specifies the destination medium where the style is appearing. |
| scoped | scoped | specifies the style tags, that is, the parent tag and its child tags. |
HTML Section Tags
The SECTION tag is used to represent the generic section of an HTML document.
The following HTML code fragment shows an example of the SECTION tag:
<SECTION>
   <H1>HTML5</H1>
   <P>A SECTION tag example</P>
</SECTION>
The HTML tags that belong to the SECTION tag are listed below.
Let's take a quick look at each of the six HTML tags that make up the SECTION tag and explain what they do.
HTML NAV Tag
To move between different HTML pages, use the NAV tag. This tag is used to display a collection of links within an HTML file.
You can see an example of the NAV tag in the HTML code below:
<NAV>
   <H1>Navigation</H1>
   <UL>
      <LI><A href="news.html">News</A></LI>
      <LI><A href="article.html">Article</A></LI>
   </UL>
</NAV>
HTML ARTICLE Tag
The ARTICLE tag is used to represent a section that contains information about an HTML page, such as its title and the date of its creation. You can display the information in this tag in various formats, such as a new article, a blog post, or a user's comments section.
The following HTML code fragment shows an example of using the ARTICLE tag:
<ARTICLE>
   <HEADER>
      Some heading content
   </HEADER>
   <P>Some article content</P>
</ARTICLE>
HTML ASIDE Tag
The ASIDE tag allows us to create a section that is used to display information about the content of the other tags, such as time and date, current news, and weather report. This tag can also be used to add typographical effects to a document, such as ads, notes, links, and tips in the sidebars.
The following HTML code fragment shows an example of the ASIDE tag:
<body>
   <aside>
      Enter some content related to the aside article.
   </aside>
</body>
HTML HEADER Tag
An HTML page's introductory material is included in the HEADER tag. Headings, paragraphs, and links are all acceptable inside the HEADER tag.
The following HTML code fragment shows an example of the HEADER tag:
<header>
   <h1>Level 1 Heading</h1>
   <a href="http://codescracker.com/html/html-section-elements.htm#sections">HTML Section Tags</a></dd>
   <nav>
      <ul>
         <li><a href="/news">News</a>
         <li><a href="/article">Article</a>
      </ul>
   </nav>
</header>
HTML FOOTER Tag
The FOOTER tag is used to represent the footer, which is a section at the bottom of a document or section of a document that has information like links and copyright information.
The following HTML code fragment shows an example of the FOOTER tag:
<footer>
   <ul>
      <li>Home</li>
      <li>News</li>
      <li>Links</li>
      <li>Article</li>
      <li>About</li>
   </ul>
</footer>
HTML ADDRESS Tag
The ADDRESS tag is normally defined at the header or footer of the HTML page and is used to display the contact information for a document, such as the name of the document's owner, maintainers, e-mail address for feedback, postal address, and phone number. The content of the address tag appears in italics on the Web browser.
The following HTML code fragment shows an example of the ADDRESS tag:
<address>
   <a href="contact.html">Contact Us</a>
   <a href="mail.html">Email ID</a>
   Personnel to contact for the a <a href="admin.html">CodesCracker Web Design Activity</a>
</address>
HTML Heading Tags
You will acquire knowledge of HTML heading tags here. Use the HTML heading tags to give your text some eye-catching titles. The six levels of headings available in HTML are as follows:
- <H1>
- <H2>
- <H3>
- <H4>
- <H5>
- <H6>
The first level heading, i.e., "H1," is the most important heading, and the last level heading, i.e., "H6," is the least important heading.
Every article has its own heading, for example, if you are writing an article about the top ten programming languages, you can title it "Top 10 Programming Languages."
Before writing content in an HTML document, you can use headings to provide a topic or sub-topic. Headings are basically the main phrases of the documents.
HTML Phrasing Tags
Phrasing tags are used to represent the text of the HTML document. These tags are also used to mark up the HTML document text within the paragraphs of the document. You can organize the text of your HTML document by using the HTML phrasing tags.
The following list describes all the phrasing tags available in HTML:
- A: represents a link to an HTML document.
- ABBR: represents an abbreviation.
- AREA: represents an area of an image map.
- AUDIO: represents audio and sound streams.
- B: represents bold text.
- BDO: represents the text direction.
- BR: represents a line break.
- BUTTON: represents a push button.
- CANVAS: allows you to draw graphics using JavaScript.
- CITE: represents a citation.
- CODE: represents code text.
- DATALIST: defines options for controls by using various tags, such as OPTION and INPUT.
- DEL: represents deleted text.
- DFN: represents the definition of the term.
- EM: represents a highlighted text.
- EMBED: represents plugin content in an HTML document.
- I: represents italic text.
- IFRAME: represents an inline frame.
- IMG: represents an image.
- INPUT: represents an input control.
- INS: represents inserted text.
- KBD: represents keyboard text.
- KEYGEN: represents a control to generate a key pair.
- LABEL: represents the label for an input tag.
- MAP: represents an image map.
- MARK: represents a text in an HTML document that is highlighted for reference.
- MATH: defines math expressions in XHTML.
- METER: defines a measurement, such as disc usage.
- NOSCRIPT: represents alternative text to be displayed on Web browsers that do not support JavaScript or have JavaScript disabled.
- OBJECT: represents an embedded object.
- OUTPUT: represents some output.
- PROGRESS: defines the progress of tasks and operations.
- Q: represents short quotations.
- RUBY: allows you to mark up ruby annotations in an HTML document.
- SAMP: represents sample computer code.
- SCRIPT: represents a client-side script.
- SELECT: represents a select list (drop-down list).
- SMALL: Represents a small text.
- SPAN: Represents a section in an HTML document.
- STRONG: Represents a strong text.
- SUB: Represents subscript text.
- SUP: Represents superscripted text.
- SVG: Defines graphics in XHTML document.
- TEXTAREA: Represents a multi-line text input control.
- TIME: Defines date or/and time.
- VAR: represents a variable part of a text.
- VIDEO: represents videos or movie streams.
- WBR: defines the possibility of a line break.
- TEXT: represents text in an HTML document.
Some of the most well-known and frequently employed HTML phrasing tags are used in the following example.
<!DOCTYPE html>
<html>
<body>

   <p><A href="#">link</A>,  <B>bold text</B>, <code>print("Hello there!")</code></p>
   <p>xyz<BR>abc</p>
   <p><DEL>deleted text</DEL>, <EM>highlighted text</EM>, <I>italic text</I></p>
   <p><MARK>marked text</MARK>, <SMALL>small text</SMALL>, <STRONG>strong text</STRONG></p>
   <p>H<SUB>2</SUB>O, (a+b)<SUP>2</SUP></p>

</body>
</html>link, bold text, print("Hello there!")
xyz
abc
deleted text, highlighted text, italic text
marked text, small text, strong text
H2O, (a+b)2
HTML Embedded Tags
Embedded tags are used to import content from other sources into an HTML document.
The following list describes all HTML embedded tags.
- AUDIO: represents audio and sound streams.
- CANVAS: allows you to draw graphics using JavaScript.
- EMBED: represents the plugin content in an HTML document.
- IFRAME: represents an inline frame.
- IMG: represents an image.
- MATH: defines math expressions in XHTML.
- OBJECT: represents an embedded object.
- SVG: defines graphics in an XHTML document
- VIDEO: represents videos or movie streams.
Comments in HTML
Comment help us describe or explain our code, which can be useful when we want to change or edit the source code in the future.
The comment tag is used to insert comments in the code of your document. In HTML, anything written between the
<!-- and -->
tags is taken as a comment by the Web browser. For example:
<!DOCTYPE html>
<html>
   <body>

      <!--Following is the container for header-->
      <div class="myHeader">
         <p>Lorem ipsum dolor sit amet.</p>
         <p>Lorem ipsum dolor sit amet consectetur.</p>
      </div>

   </body>
</html>Lorem ipsum dolor sit amet.
Lorem ipsum dolor sit amet consectetur.
These comments are ignored by the web browser and are not displayed on the HTML page. For example:
<!DOCTYPE html>
<html>
   <body>

      <div class="myHeader">
         <p>Lorem ipsum dolor sit amet.</p>
         <!-- <p>Lorem ipsum dolor sit amet consectetur.</p> -->
      </div>

   </body>
</html>Lorem ipsum dolor sit amet.
Audience Message
We hope that the extensive use of examples throughout this "HTML course" will prove useful in facilitating the learning process for all readers.
Due to the inefficiency of trying to cover the entire course in a single article, the following topics and articles have been created to better organize the material presented in this course:
- Document Structure in HTML
- Root tags in HTML
- Flow tags in HTML
- Interactive tags in HTML
- Basic tags in HTML
- Create a paragraph in HTML
- Create a line break in HTML
- Create a horizontal line in HTML
- Add images to a web page
- Data types in HTML
- Attributes in HTML
- Character entities and codes in HTML
- HTML Styles
- Formatting text in HTML
- Logical style text in HTML
- Text organization in HTML
- Create a list in HTML
- Create a table in HTML
- Create a form in HTML
- The "action" attribute
- Insert multimedia into your website
« CodesCracker.com Next Tutorial »