- SQL Tutorial
- SQL Tutorial
- SQL Display Data
- SQL Update Records
- SQL Delete Record
- SQL Alter Table
- SQL Join Tables
- SQL Auto Increment
- SQL Drop Table/Database
- Computer Programming
- Learn Python
- Python Keywords
- Python Built-in Functions
- Python Examples
- Learn C++
- C++ Examples
- Learn C
- C Examples
- Learn Java
- Java Examples
- Learn C#
- Learn Objective-C
- Web Development
- Learn HTML
- Learn CSS
- Learn JavaScript
- JavaScript Examples
- Learn PHP
SQL Tutorial with Examples
Hey guys, I'm Dave, and I'm your instructor for the SQL. I will teach you all the basics of SQL, like how you can use this database language to insert, update, retrieve, and delete data from the database. But before we begin, there are some important details about SQL that I'm willing to tell you. So without any delay, let's start 😊.
Introduction to SQL
SQL, which stands for "Structured Query Language," was initially called "SEQUEL," which was an acronym for "Structured English Query Language," and is a language used to store, manage, manipulate, and retrieve data from or within a database.
SQL was designed by two researchers at IBM, whose names are Donald D. Chamberlin and Raymond F. Boyce. SQL is a very old language, as it first appeared in 1974, almost 50 years ago, but it is still a powerful 💪 and widely used language for databases.
Let me share a lovely SQL memory with you: In 1970, Oracle Corporation saw the potential and made their own SQL-based RDBMS to sell to the US Navy, the CIA, and other important government agencies.
SQL is a very easy language to learn. I mean, it takes less time to learn and enhances your skills in the field of IT. In short, learning SQL means spending less time to achieve more. So instead of wasting time learning a language that takes much of your crucial time and gives unpredictable outcomes, learn SQL and be confident to add this language to your resume.
Having the skills for SQL makes you a better backend programmer. The more SQL skills you have, the better backend programmer you will be 👍.
Create, insert, select, update, and delete are the five most important things that SQL can do to a database. Not to worry for now; you will get to know it later on in this tutorial.
Now I think these knowledges are enough to start learning SQL. Because I believe in coding and practical work instead of information and theoretical knowledge. Just one more thing. All of the codes and information in this comprehensive SQL tutorial are for MySQL.
Setup for SQL to Learn It Practically
Before I actually start writing and teaching you the SQL query, we need to setup the environment first. Now let me tell you the simplest way to setup the environment for SQL so that you can instantly do the setup and start learning SQL practically by writing and implementing the code yourself.
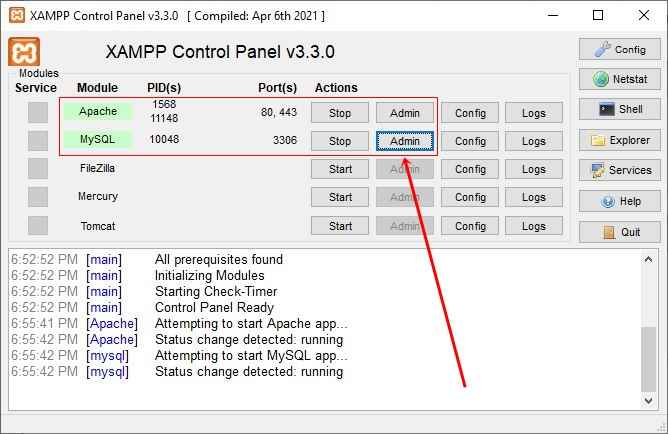
Download a software called "XAMPP" from the Internet and install it on your computer system. After the installation, open it. Now click on the two "Start" buttons next to Apache and MySQL, and then click on the "Admin" button next to MySQL. Here is a snapshot for your understanding:
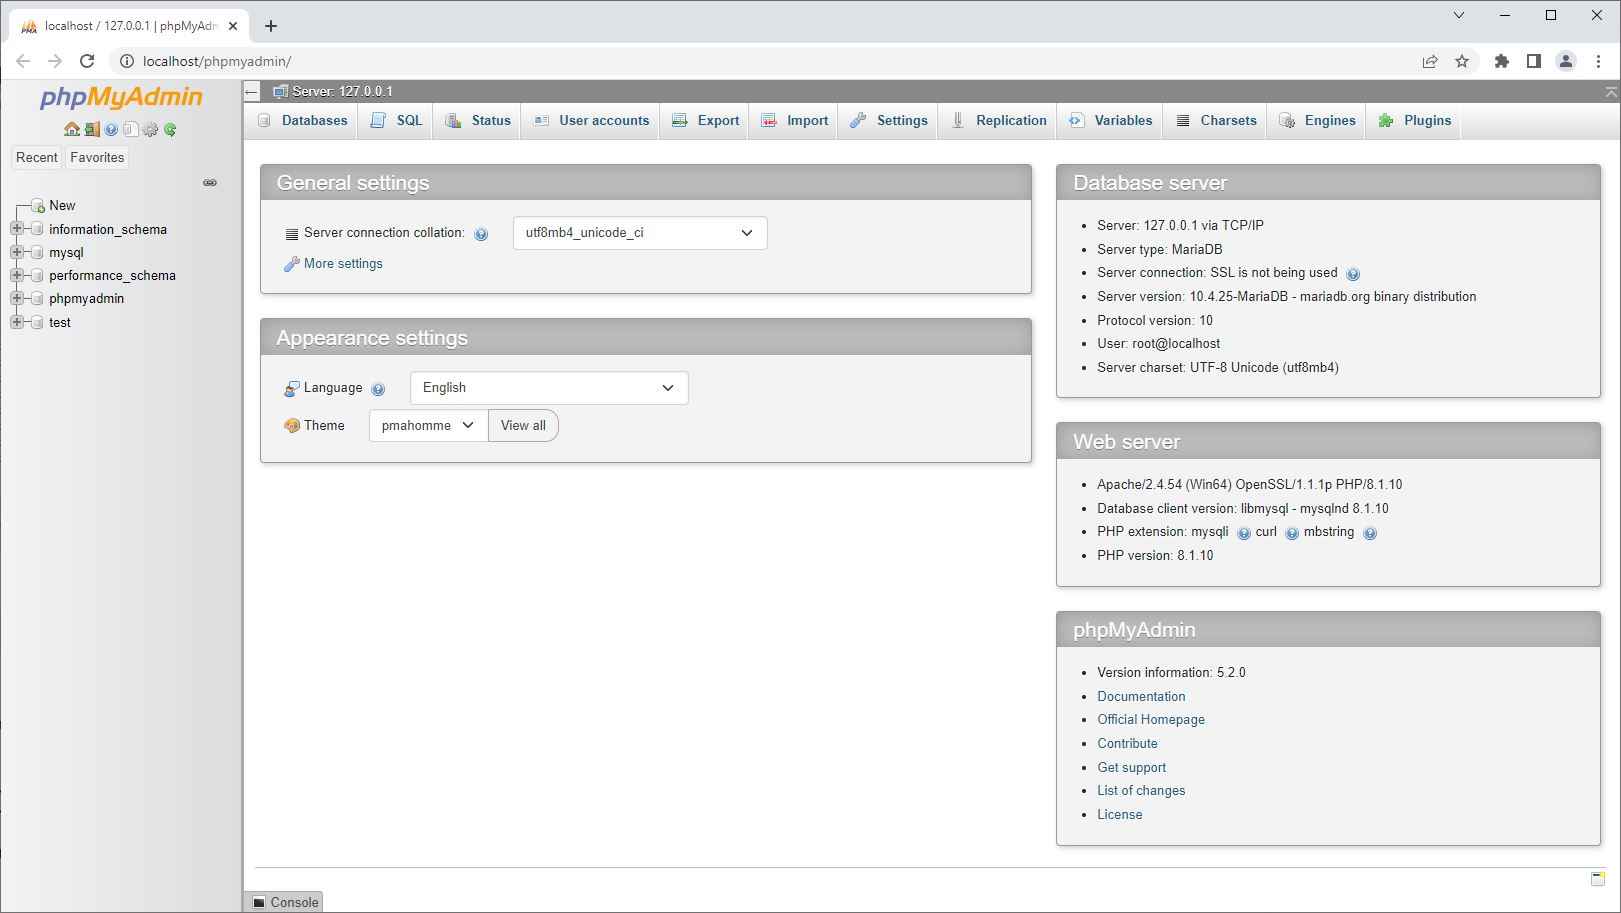
After clicking on the "Admin" button, the software will redirect you to your default web browser and take you to the phpMyAdmin page, located at "http://localhost/phpmyadmin/." Here is a snapshot for your understanding.
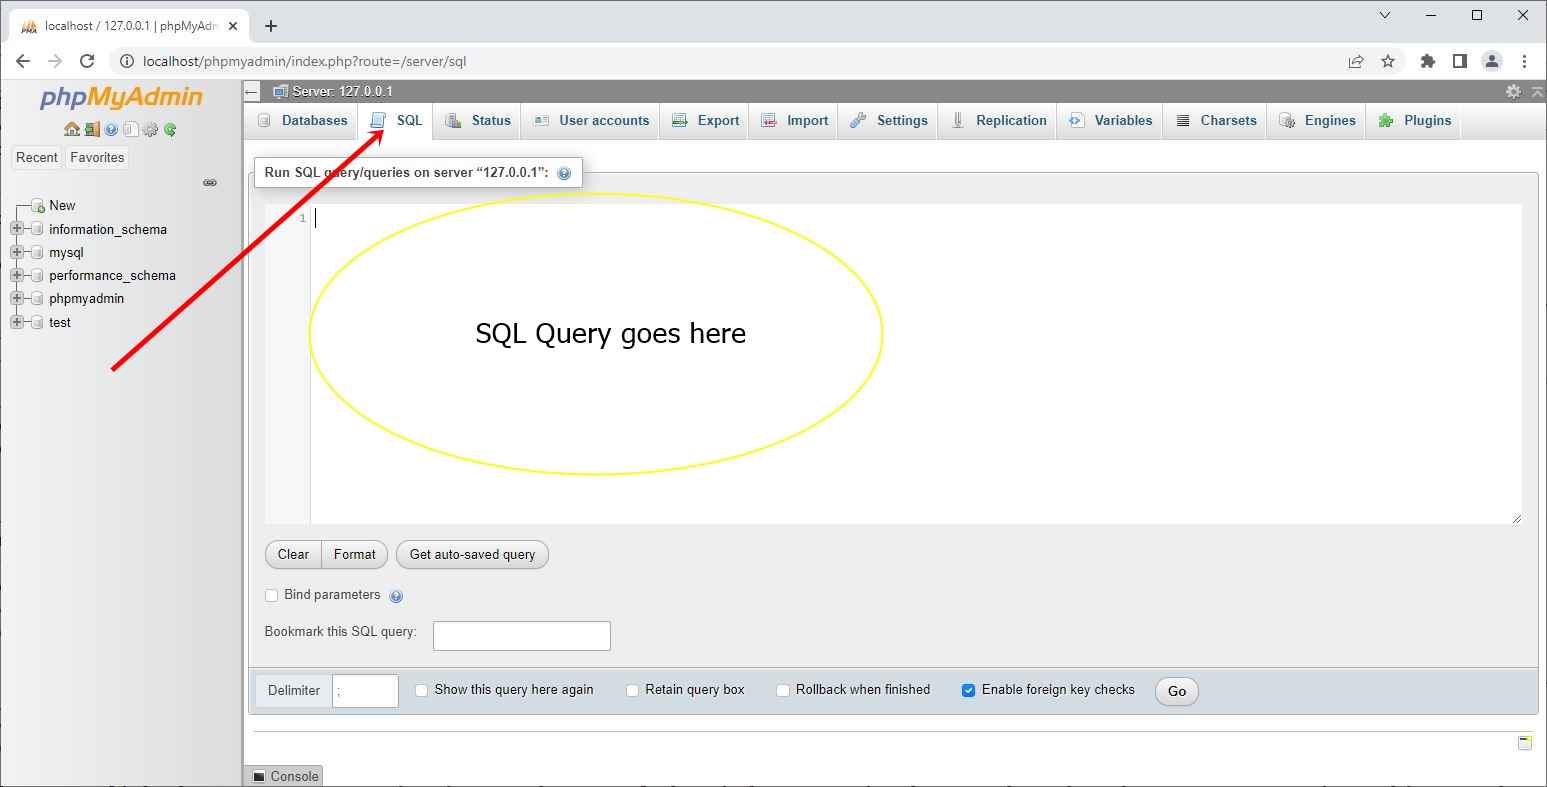
You click on the "SQL" link that appears as navigation on the top of the window. Here is the snapshot that draws your attention. This snapshot also shows how the screen will change after clicking on the "SQL" section or button. Now all your SQL commands or code will be written in this white window, down to the text "Run SQL query/queries on server "127.0.0.1":"
Now here we go. All is set now 😋; let's start coding or learning SQL in a step-by-step manner by doing the practical job as well.
Since before we begin performing SQL queries to learn SQL practically, we need a database and then a table inside it. So why don't we start with the SQL command that is used to create the database and table?
Create a Database with SQL
The CREATE DATABASE command is used to create a database. Here is the general form to create a database.
CREATE DATABASE database_name;
For example, the following SQL code will create a database named "codescracker".
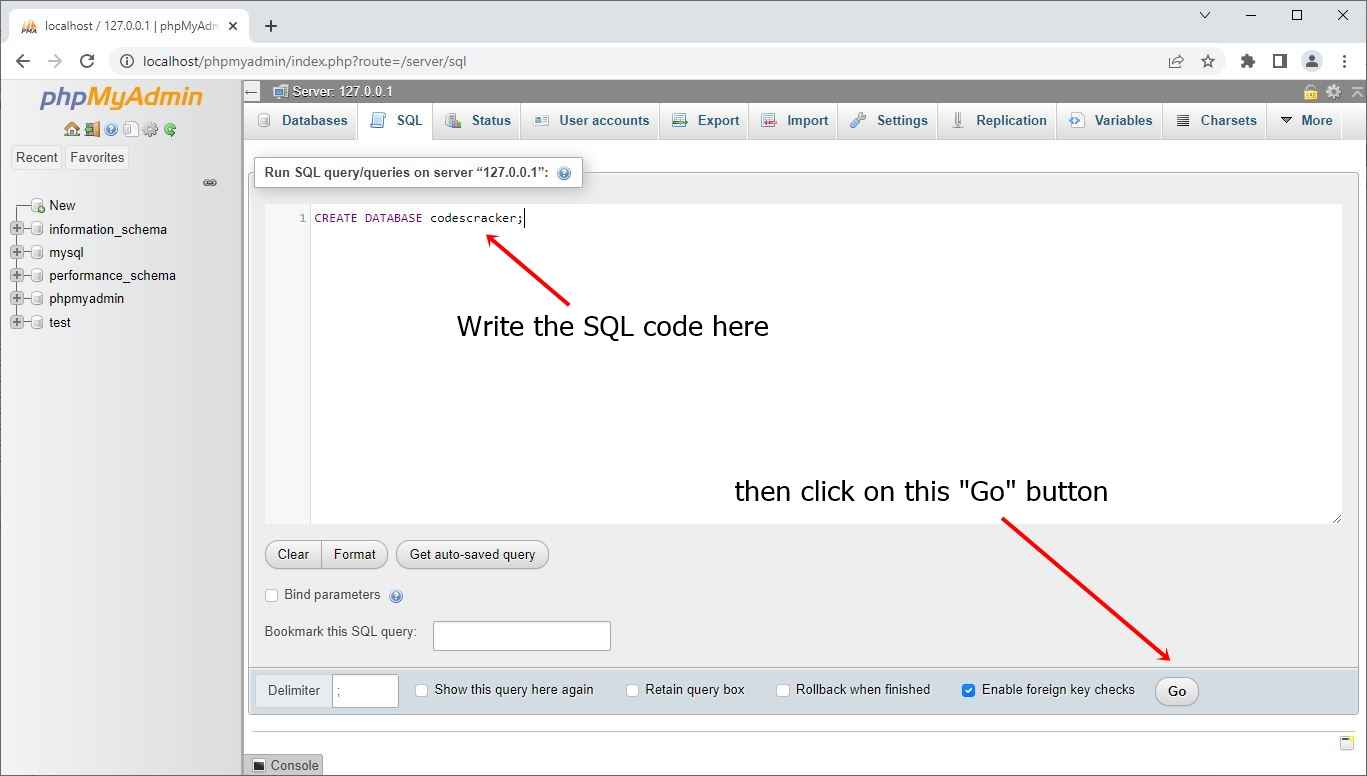
CREATE DATABASE codescracker;
Now write the above SQL statement in that white window that I already mentioned, and click on the "Go" button to execute the SQL query or code. Here is a snapshot for your understanding.
After writing the above SQL statement and clicking on the "Go" button, you will have a new database named "codescracker" created. Here is the sample window you will see after clicking on the "Go" button:
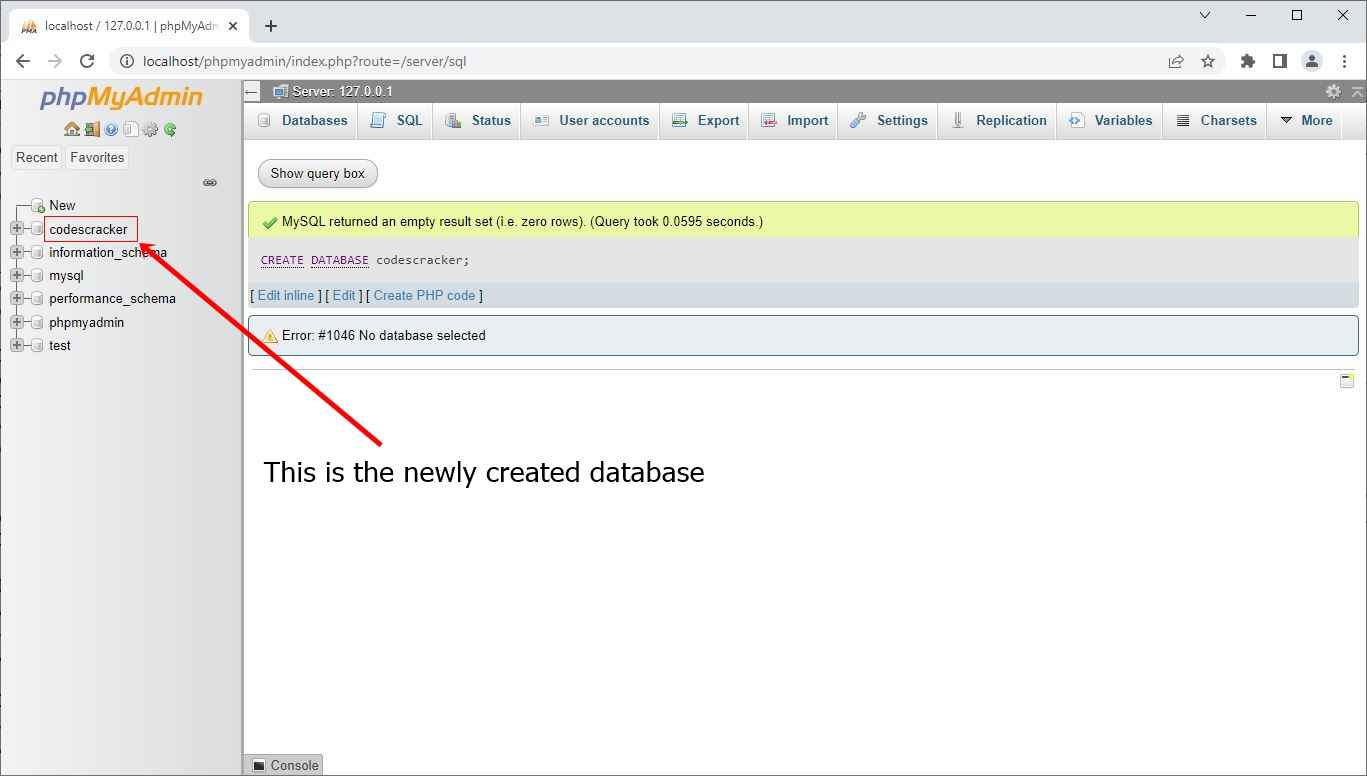
You see how easy SQL is. That is, when we need to create a database, the SQL code to do the job is "CREATE DATABASE name." It is something like me writing in English to a person to create a database.
We have a database with which to work. It is now time to make a table in it. However, because a table is made up of rows and columns, and as we know, some columns can hold char-type values such as names and cities, while others can hold int-type values such as id, roll number, and so on. And, before we can store these types of values in a column, we must first define its type. As a result, it is preferable to understand the various types of data used in SQL before creating tables with them.
Data Types in SQL
Because SQL supports a wide range of data types, we will only cover the most important and commonly used ones. I don't think it's worthwhile to waste time discussing data that is rarely used.
Therefore, let me list out the important and most-used data types in SQL along with their range. So I have created the table for you that lists the important data types, which is given below.
| Data Type | Range | Store what? |
|---|---|---|
| CHAR | 0 to 255 | String |
| VARCHAR | 0 to 65,535 | String |
| TEXT | 0 to 65,535 | String |
| MEDIUMTEXT | 0 to 16,777,215 | String |
| LONGTEXT | 0 to 4,294,967,295 | String |
| TINYINT | -128 to 127 (signed) or 0 to 255 (unsigned) | Integer |
| BOOL | true or false | Boolean values. Inserting 0 in it will be treated as false, whereas other will be treated as true |
| SMALLINT | -32,768 to 32,767 (signed) or 0 to 65,535 (unsigned) | Integer |
| MEDIUMINT | -32,768 to 32,767 (signed) or 0 to 65,535 (unsigned) | Integer |
| INT | -2,147,483,648 to 2,147,483,647 (signed) or 0 to 42,949,672,95 (unsigned) | Integer |
| BIGINT | -9,223,372,036,854,775,808 to 9,223,372,036,854,775,807 (signed) or 0 to 18,446,744,073,709,551,615 (signed) | Integer |
| DATE | 1000-01-01 to 9999-12-31 | Date. Format: YYYY-MM-DD |
| DATETIME | 1000-01-01 00:00:00 to 9999-12-31 23:59:59 | Date and time. Format: YYYY-MM-DD hh:mm:ss |
| TIMESTAMP | 1970-01-01 00:00:01 to 2038-01-09 03:14:07 | Initialize current date and time automatically |
| TIME | -838:59:59 to 838:59:59 | Time. Format: hh:mm:ss |
| YEAR | 1901 to 2155 | Year |
While defining the data type for a column, you also need to define the size parameter that is used to specify the maximum length that the column can hold values of that particular type. So here is the list of data types that allow the size parameter to be defined.
- CHAR(size)
- VARCHAR(size)
- TEXT(size)
- TINYINT(size)
- SMALLINT(size)
- MEDIUMINT(size)
- INT(size)
- BIGINT(size)
For example, if we need to define a column whose name is "username" and it can hold values of type "VARCHAR" with a maximum length or size of 50 characters, Therefore, here is the SQL code you need to write:
username varchar(50)
Now, I think it is the right time to create a table with SQL code. So what are we waiting for? Let's start creating the table in the next section ☺.
Create a Table with SQL
Creating a table with SQL looks similar to creating a database with SQL. The only difference is that since the table contains one or more columns, we need to write some extra SQL code that will be for inserting the column in the table. Before writing the actual SQL code to create a table. Let me write the general form of creating a table with SQL.
CREATE TABLE tableName (
   column1Name column1DataType,
   column2Name column2DataType,
   column3Name column3DataType,
   .
   .
   .
   columnNName columnNDataType
);
For example:
CREATE TABLE customer (
    id int(6),
    firstName varchar(30),
    lastName varchar(30),
    email varchar(70),
    city varchar(30),
    datetime timestamp
);
After executing this SQL code, you will have a newly created table in your database. Before writing or doing a copy and paste job of this SQL code in that white box, which I already mentioned where to write the SQL code and where the "Go" button is to be clicked to execute the code, be sure to click the "codescracker" database or the database in which you need to create the table.
Now, here is the newly created table after performing the execution of the above SQL program or code.
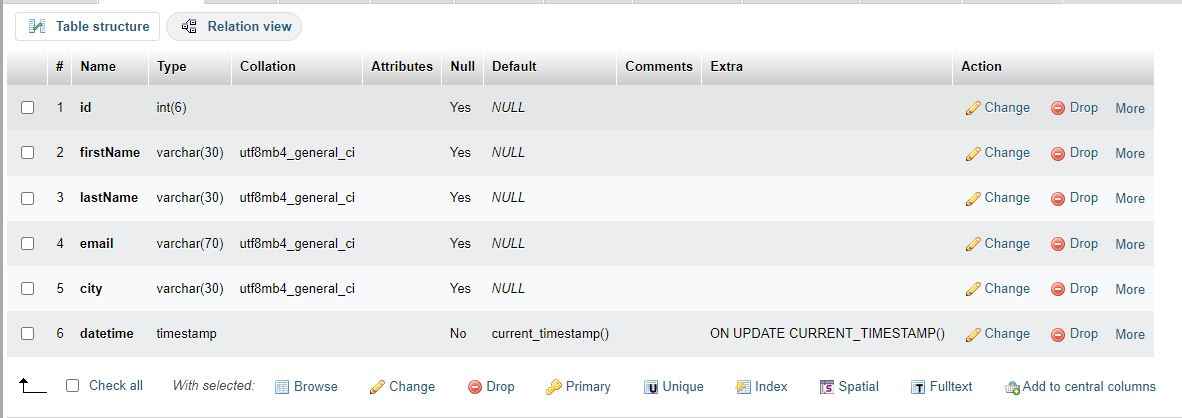
The table is successfully created, but something is missing, which is that we need to add a primary key that can be used to verify each row of the table uniquely through the primary key. So to make "id" the primary key of the table, you need to execute this SQL query instead of the above one while creating the table. One more thing is that, since the "id" column, which I am going to set as a primary key to uniquely identify each row, and since I want this column to fill its value automatically, like starting from 1, and incrementing by 1 each time when adding a new row to the table. Therefore, there is a SQL code, "AUTO_INCREMENT," that needs to be added right after the "id int(6)."
CREATE TABLE customer (
    id int(6) AUTO_INCREMENT,
    firstName varchar(30),
    lastName varchar(30),
    email varchar(70),
    city varchar(30),
    datetime timestamp,
    PRIMARY KEY (id)
);
Now if you want a column that always needs or requires a value when filling a new row, then you can define that column with "NOT NULL" keywords in this way.
id int(6) NOT NULL AUTO_INCREMENT,
Or
email varchar(70) NOT NULL,
Don't worry, you will be able to understand all these codes while learning SQL one by one.
Insert Data into a Table with SQL
Because a table named "customer" has been created. So now is the time to insert or feed some data into it. To insert data into a table with SQL, here is the general form you need to follow:
INSERT INTO tableName (column1Name, column2Name, column3Name, ..., columnNName)
VALUES (column1Value, column2Value, column3Value, ..., columnNValue);
Here is the actual SQL code that will insert the data into the table.
INSERT INTO customer (firstName, lastName, email, city)
VALUES ('Emily', 'Roebling', 'emily@xyz.com', 'Roseburg');
Please don't insert the data into a column that is set to be automatically incremented like I defined the "id" column to be. Therefore, I will not include this column while inserting the data into the table. Also, I have not included the "datetime" column, as that column is defined as a timestamp, which automatically inserts the current date and time when the new row is inserted. Now here is the snapshot of my table after executing the above SQL query.
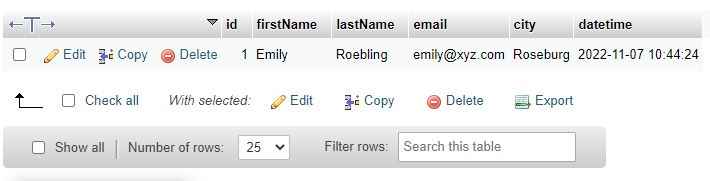
Because the current date and time when I inserted the data into the table through the SQL query given above was November 7, 2022, with 10:44 AM as the time, the "datetime" has the value that was automatically inserted, which was the date and time when the row was inserted.
If you want to insert multiple rows at once, for example, three rows at once, then here is the SQL query you need to follow:
INSERT INTO customer (firstName, lastName, email, city)
VALUES ('Mark', 'Hyman', 'mark@xyz.com', 'Austin'),
('James', 'Andrews', 'andrew@xyz.com', 'Richfield'),
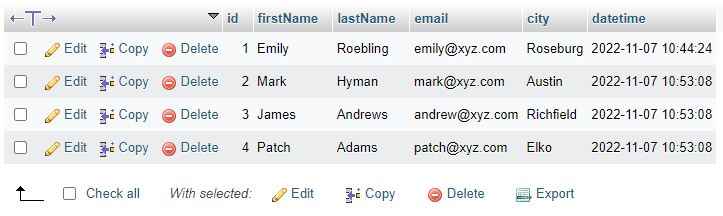
('Patch', 'Adams', 'patch@xyz.com', 'Elko');
Now here is the new snapshot of the table after executing this SQL query.
So the good news is that we now have a database and a table in it, along with some data that was inserted a little earlier. Therefore, now is the time to start exploring more about SQL, like how to display the data, modify the data, and many more.
Since the content was becoming a little lengthy, I decided to divide the SQL tutorial into this and some other posts. So here is the end of this post. Continue learning SQL by clicking on the "Next Topic" button given right after this paragraph.
« CodesCracker.com Next Topic »